This is an old revision of the document!
Arma3Sync Setup
Step 1 (Getting Arma3Sync)

- Get Arma3Sync from Sons of Exiled or from our mirror here. It requires Java Runtime Environment, so install that if you don’t have it (there is also a link on the Armaholic page). Careful: the Java installer will prompt you to install the Ask Toolbar. Installing the Ask Toolbar is not necessary.
- Install Arma3Sync with its defaults.
- Navigate to the Arma3Sync directory (it defaults to
C:\Program Files (x86)\ArmA3Sync), right click on theArma3Sync.exe, select “Properties” and check “Run this program as an administrator”.
Step 2 (Update Arma3Sync)
Open Arma3Sync. Accept updates if necessary. The updater is built into the app and works pretty well.
Step 3 (Configure Arma 3 Folder)
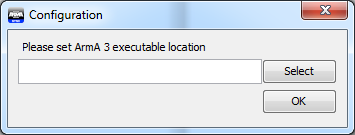 Find your Arma3 executable. It’s generally in one of the following:
C:\Program Files (x86)\Steam\steamapps\common\Arma 3\C:\Program Files (x86)\Bohemia Interactive\Arma 3\C:\Program Files\Bohemia Interactive\Arma 3\
Make sure arma3_x64.exe is part of whatever path you enter.
Step 4 (Configure Addon Storage)

Add a default addon search directory. Click on the Addon Options tab, then the blue plus sign on the right and specify the directory containing your existing @ folders, if any, or where you’d like them to download to.
Note, some of the mods we use may be different from versions found elsewhere. For example, in @ace we’ve omitted the ace_aircraft PBO because of conflict with RHS aircraft HUDs or in the RHS AFRF folder we’ve included a hotfix to fix crashing issues with tanks. If in doubt, you should store CBB mods in their own folder away from any existing mods.
Step 5 (Adding Repositories)
First, a word on how we organize our modset. The Clear Backblast modset is broken up into 3 categories of repositories, they are:
- Required: This category only contains one repository, and it is required for all CBB game sessions unless otherwise stated.
- Modules: These repositories contain extra content that is sometimes required for a particular game session but they are not to be loaded unless specified. You can download them during your initial setup if you like however they are not required for typical CBB activities.
- Optional: These repositories contain content that is largely personal preference, from sound mods, to things to make the game more immersive. You may pick and choose which you decide to download and play with.
Required
- Clear Backblast:
https://cdn.clearbackblast.com/required/.a3s/autoconfig- The core modset.
Modules
- ALiVE:
https://cdn.clearbackblast.com/mod_alive/.a3s/autoconfig - ASR AI:
https://cdn.clearbackblast.com/mod_asr/.a3s/autoconfig - World War 2:
https://cdn.clearbackblast.com/mod_ww2/.a3s/autoconfig
Optionals
- Sound Mods
- DynaSound:
https://cdn.clearbackblast.com/opt_dynasound/.a3s/autoconfig- Not compatible with JSRS4
- Enhanced Soundscape:
https://cdn.clearbackblast.com/opt_ess/.a3s/autoconfig- A collection of sound effects to be used with Dynasound or JSRS.
- JSRS4:
https://cdn.clearbackblast.com/opt_dragonfyre/.a3s/autoconfig- Not compatible with Dynasound
- Immersion
- Immersive:
https://cdn.clearbackblast.com/opt_immersive/.a3s/autoconfig- Includes features like screen shake near explosives, screen shading on weapon recoil, and more. Individual components can be toggled in the ingame Addon Options Menu.
- No Crosshair:
https://cdn.clearbackblast.com/opt_nocrosshair/.a3s/autoconfig- What it sounds like, removes the crosshair.
- Quality of Life
- Head Range Plus:
https://cdn.clearbackblast.com/opt_hrp/.a3s/autoconfig- Increases the total range of head rotation, to be used with head tracking setups.
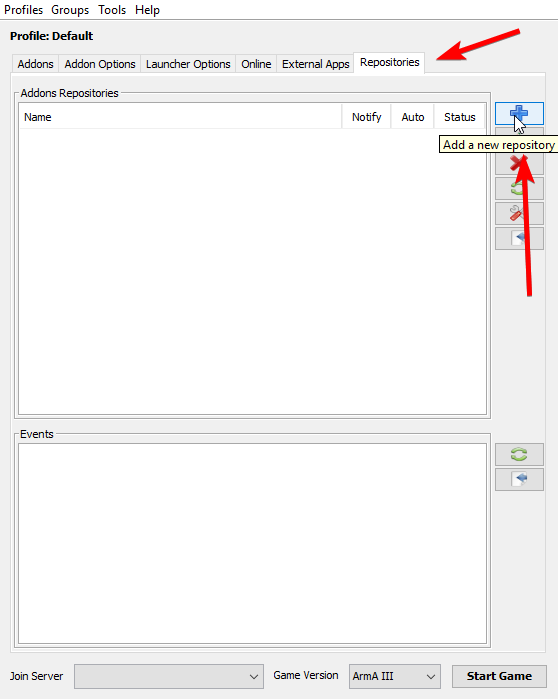
Click on the Repositories tab, then the plus sign to add the Clear Backblast repository.
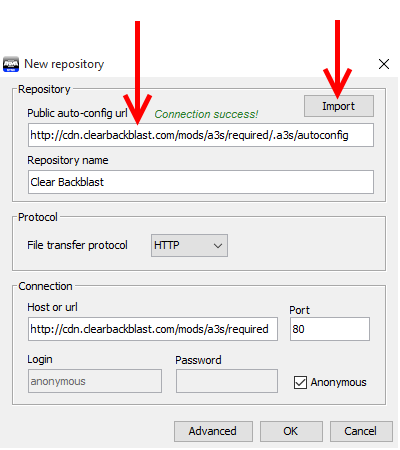
Copy the Auto-Config URL into the “Public auto-config URL“ box, click the Import button, and A3S will fill in the rest for you. Click OK and the repository will be created.
Step 6 (Downloading the addons)
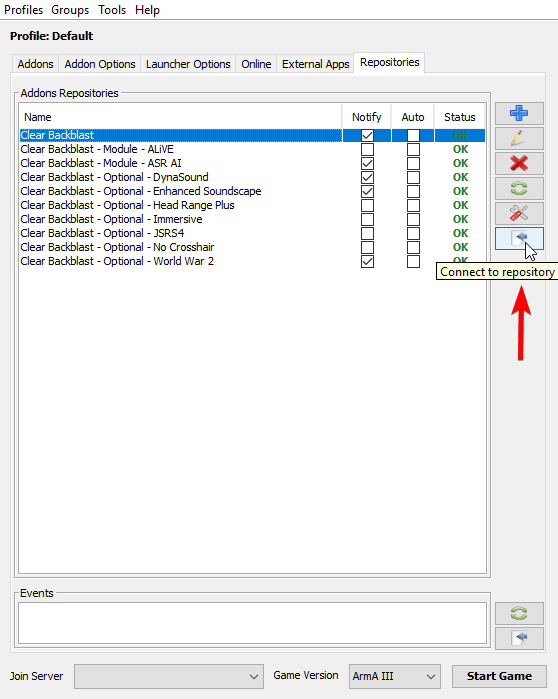
We strongly recommend checking the “Notify” box, you will be notified on launching A3S when a repository has been updated.
Click on the “Connect to repository” button.
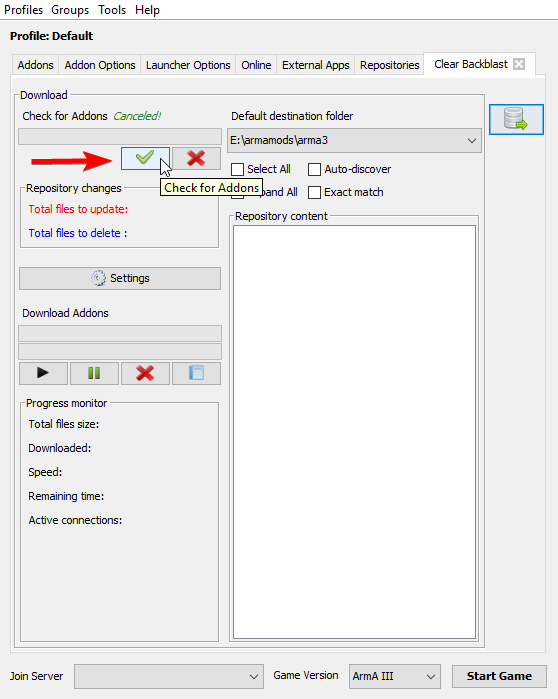
The repository will open in a new tab. Click the green checkmark to start comparing your destination folder to the Clear Backblast repository.
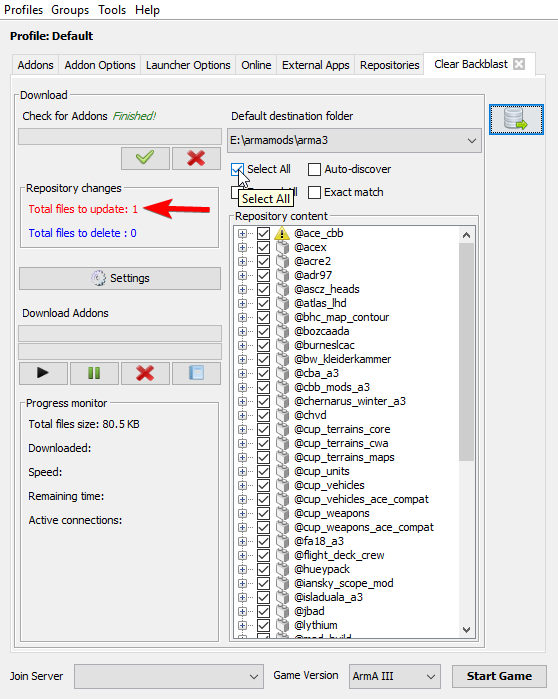
For playing with CBB you’ll want to check “Select All” to make sure everything is updated (in this example only one file needs updating).
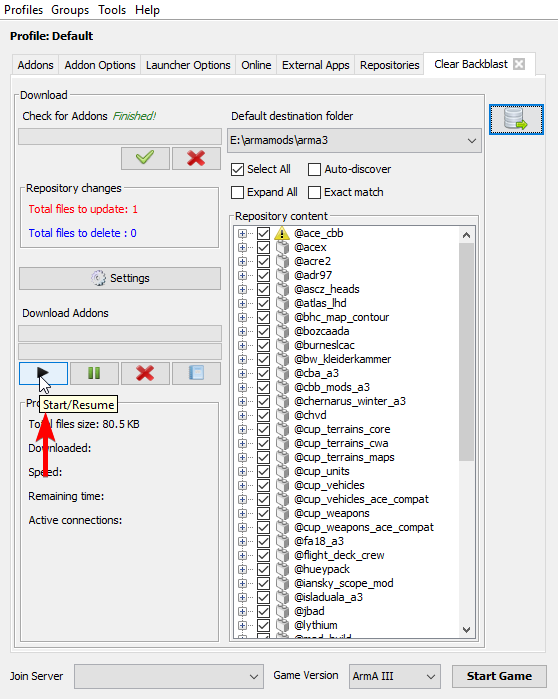
Click the “play” button (solid right arrow) under “Download Addons” and the download will begin.
Plan ahead for this download if your connection is slower as the required portion of the CBB repository is large (>30 GB).
Step 7 (Loading the addons)
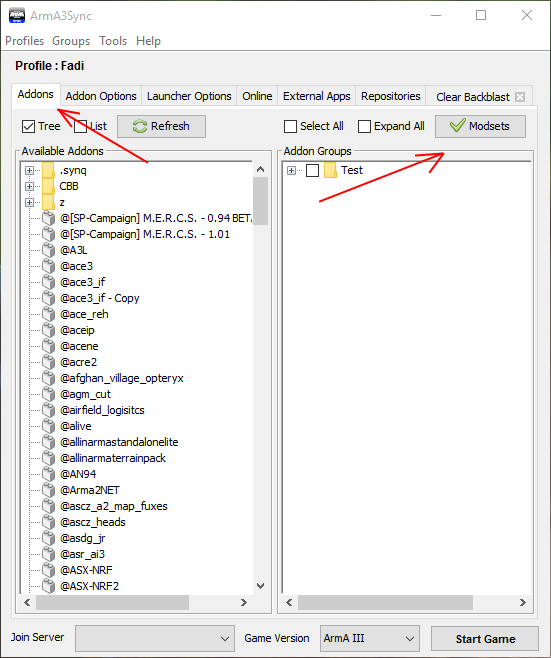
The next step is to create the mod groups that use each repository. Click the “Addons” tab and then click “Modsets”. If this button doesn’t show up, you may need to resize the window to make it a bit wider.
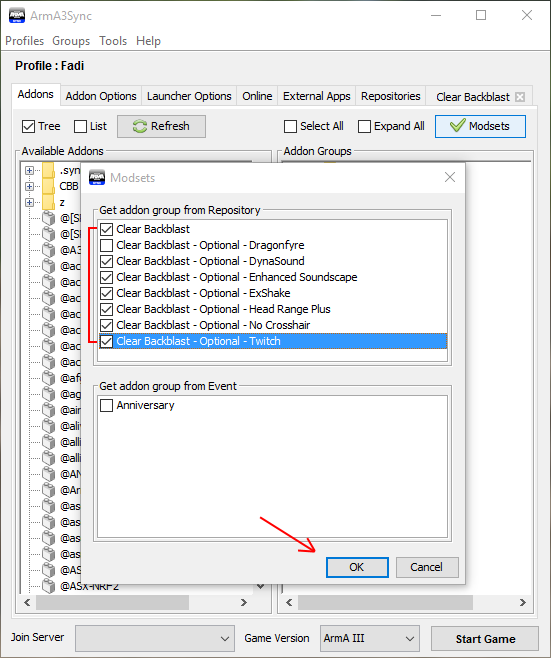
Check the boxes for whatever repositories you want to use and hit “OK”
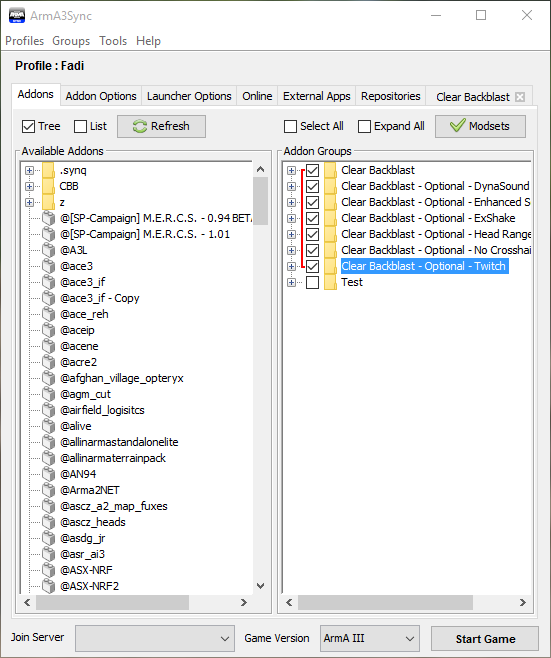
Now back in the main interface check whatever mod groups you want to launch the game with.
Step 8 (Setting launch options)

In the “Launcher Options” tab, you can set some additional checkboxes to get into the game faster, bypassing the splash screen and preventing some of the behind-the-menu animations.
Great work! You should now have the required mods downloaded, continue on to the next step, Configuring your in-game settings.