This is an old revision of the document!
Mission Making
Introduction
Hello, and welcome to GB7’s tutorial for making CBB missions- in this short document, we’ll be going over the basic requirements for a midweek-scale mission and one of the many ways in which a completed mission can be created; allow me to emphasise, this tutorial outlines the approach I take to making small missions and should not be taken as gospel. There are many different ways to approach this, and in time you will find your own method that suits you best. Anyway, set aside a couple of hours and get ready to do some learning! Shall we begin?
Basic Stuff
Before we dive head first into making a mission, there are a few things you’ll probably want to have set up.
- ARMA 3 - duh
- The CBB mod preset - this is probably a given, but just in case you have any doubts, you’ll be needing this.
- Access to the CBB mission framework- you can get this by asking for it in #workshop on Discord or by downloading it from the CBB Gitlab. It forms the basis for all of our missions and has some cool features.features.
- A copy of the CBB compositions- Again, these can be found on the CBB Gitlab. They are also available from the framework mission. Instructions on how to install them are here.
- Notepad++- This tool is incredibly useful for editing .sqf, .hpp and .txt files. This (or a similar program, if you prefer) is a must have.
Step 1- Starting a new mission
OK, for the purposes of this tutorial, we will be making a small concept mission with 10 players. Feel free to mess about with the factions and objectives, but for the sake of simplicity I’ll be making a mission with the following characteristics:
- US Army vs Russian MSV
- US Army has 2 HumVees
- Russians hold 2 towns, US must clear towns.
First thing we need to do to make this is pick a map- if you have a particular mission idea, this is the first thing you’ll need to nail down. Let’s open the editor from the A3 main menu and look at our options.

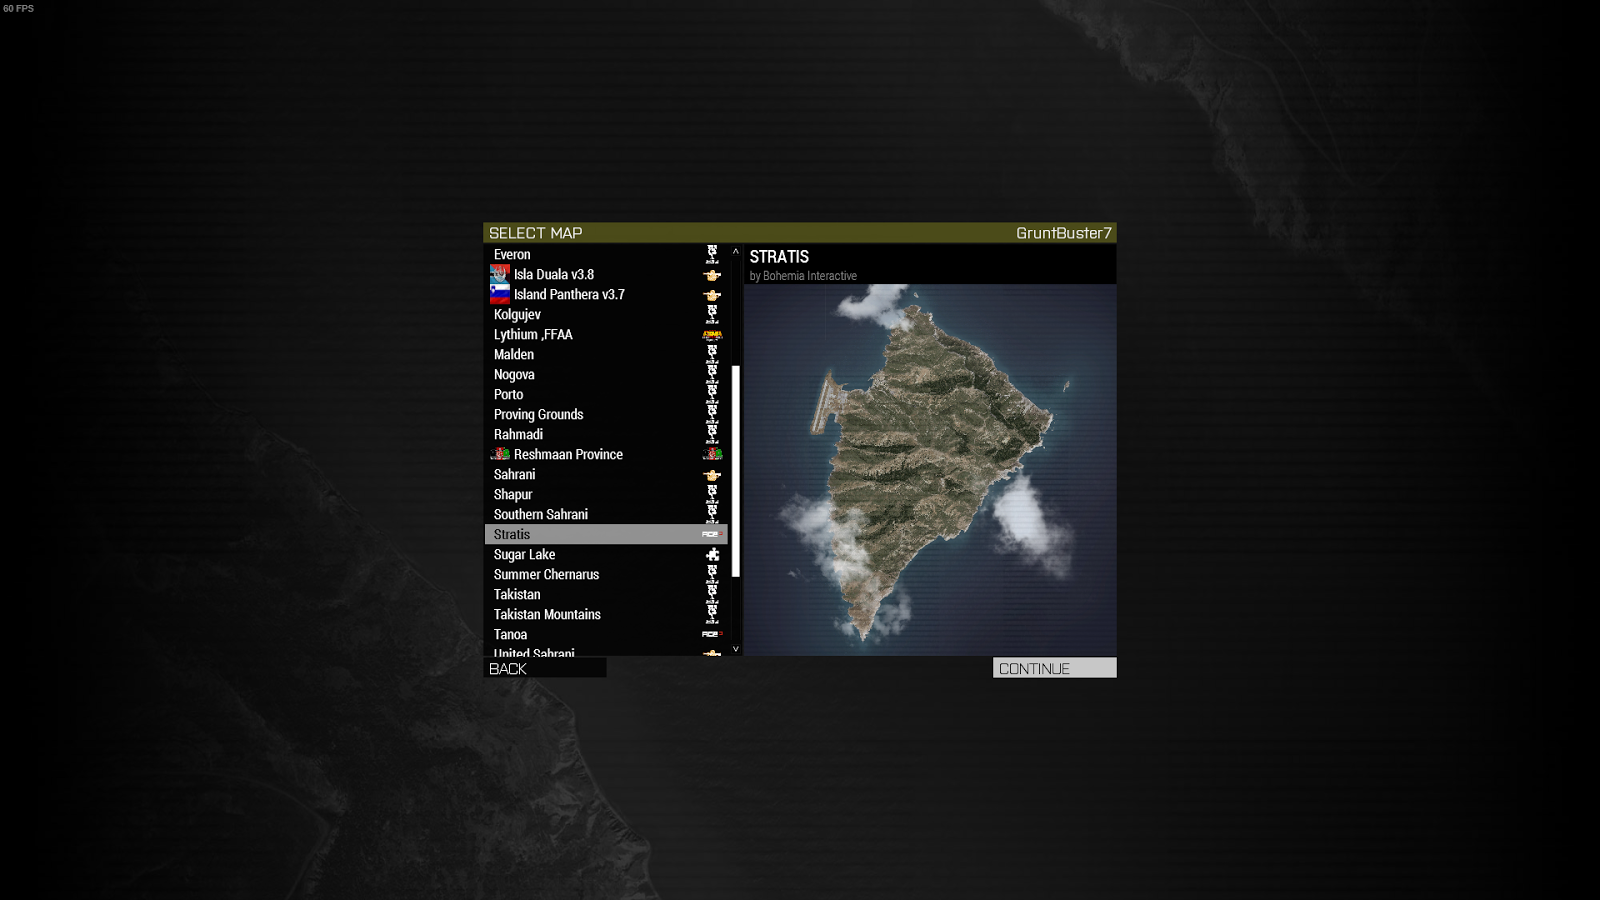 The list of maps that you are faced with may be different, depending on what mods are in the CBB preset when you make your mission. For the sake of versatility, I will pick Stratis as the locale for our mission. Select the map you want to use and click continue.
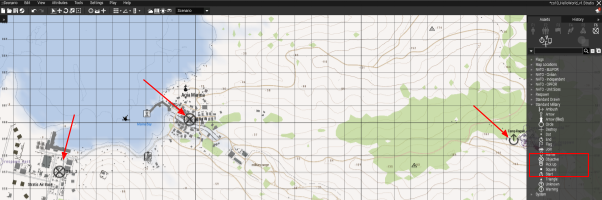
Once the map loads, you will be dropped somewhere on the map. If you are unsure of the editor controls, be sure to check them in the options menu. There are 3 main elements to the editor screen detailed below.
The list of maps that you are faced with may be different, depending on what mods are in the CBB preset when you make your mission. For the sake of versatility, I will pick Stratis as the locale for our mission. Select the map you want to use and click continue.
Once the map loads, you will be dropped somewhere on the map. If you are unsure of the editor controls, be sure to check them in the options menu. There are 3 main elements to the editor screen detailed below.
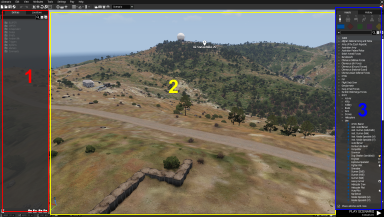
1- This is the EDIT panel. This contains all placed entities in the mission file. It should be blank currently. This panel can be toggled by pressing ‘E’.
2- This is the main view window. Pretty self explanatory, but if you have any difficulties with it, be sure to check the ‘Camera’ and ‘Zeus’ controls in the Settings tab in the toolbar at the top.
3- This is the CREATE panel. In order to create a mission, assets from here can be placed in the main window and manipulated. This panel includes all placeable units, props, groups, triggers, waypoints, modules, and markers. It can be toggled with ‘R’.
Once you feel familiar with the editor (I recommend a few experiments with the camera to get used to the controls), it’s time to start making this a CBB mission. Save the mission by pressing [Ctrl+S] or by selecting from the ‘Scenario’ dropdown in the top right. You can call your mission whatever you like, but I’m going to settle for ‘co10_HelloWorld_v1’. To explain this slightly convoluted title, we’ll break it down. ‘co10’ designates it as a co-operative mission for up to 10 players. Underscores are used to ensure file names are sorted correctly [citation needed]. ‘v1’ shows that this is the first version of the mission- the version number changes when a major change is made, such as the removal of an objective or addition of a new feature. As for ‘HelloWorld’, that’s a hilarious joke.
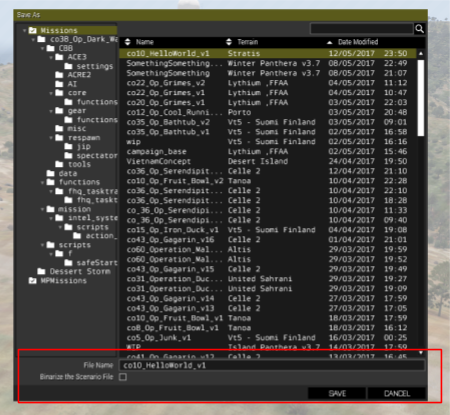 CRUCIAL- Make sure you have UNTICKED the ‘Binarize’ checkbox before you save.
Step 2- Setting up the framework
Once you’ve done this, [Alt+Tab] out and open ‘My Documents’. You’ll be looking for a path like this :
C:\<User>\My Documents\Arma 3 - Other Profiles\<ProfileName>\missions
Once there, find the folder called ‘co10_HelloWorld_v1’ or whatever you called your mission. Opening this folder, you should discover a lonely file, called ‘mission.sqm’. This is the core of every mission- it is essentially a list of everything in the mission. In order to make this a CBB mission, we need to add the framework to it. Navigate to whichever folder you’re keeping it in and copy everything in ‘cbb_framework_a3.VR’ except the ‘mission.sqm’ into your own mission folder.
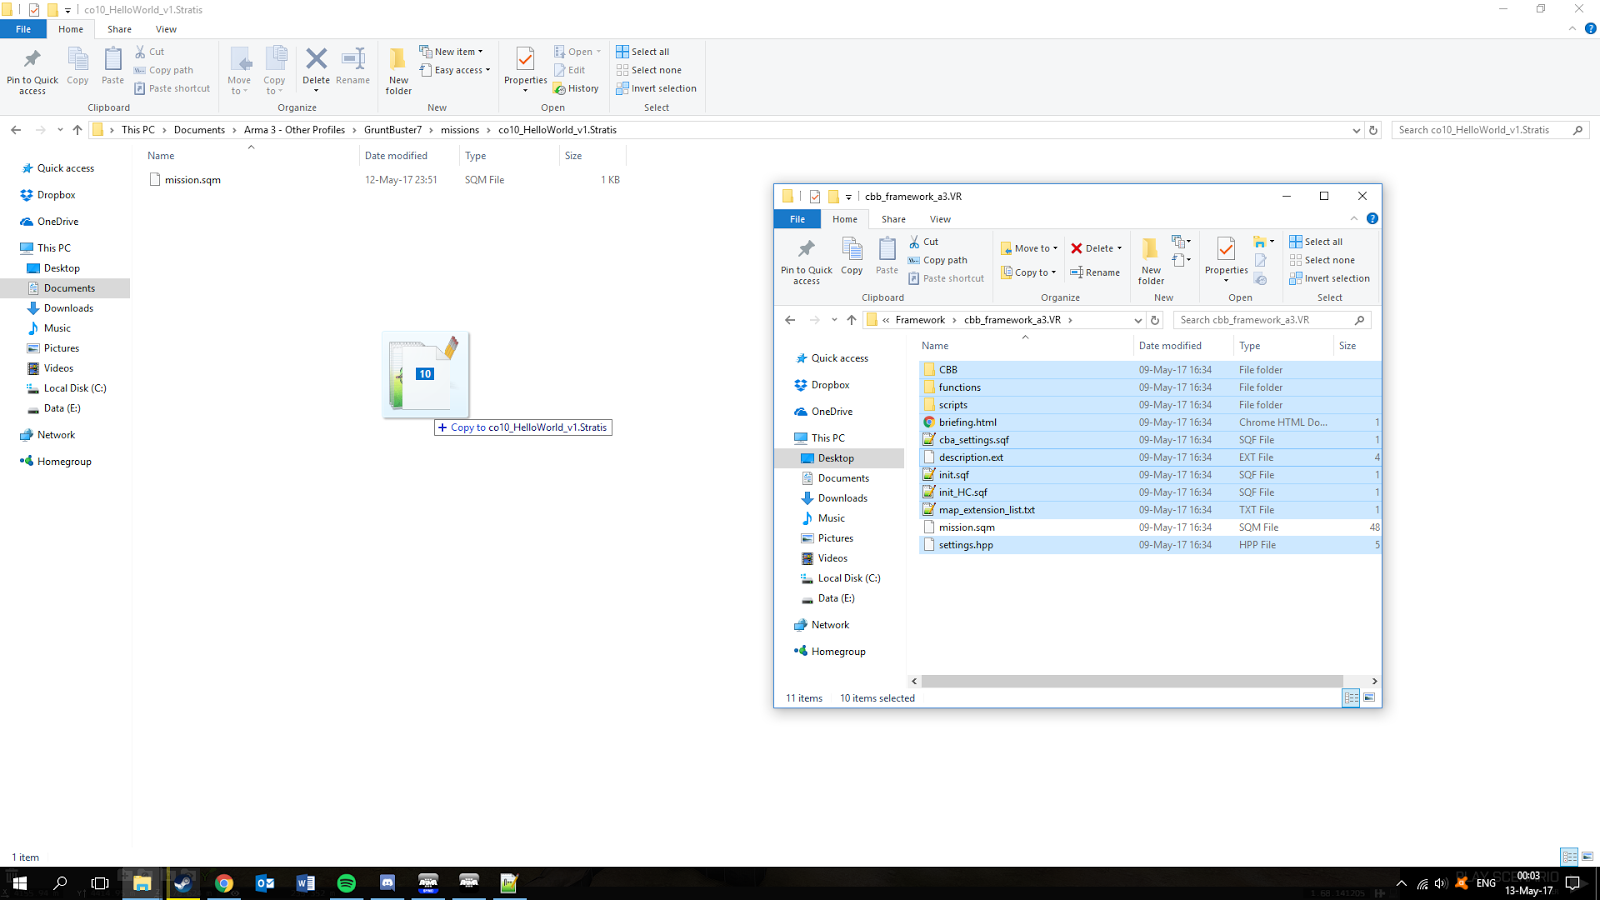 Congratulations, you now have a CBB mission! We’re nearly a whole 10% done! Seriously though, we’re just getting started. With any luck and a basic ability to follow instructions, you should now have a folder with your mission’s name on it and the framework inside of it (minus the framework’s ‘mission.sqm’).
Settings.hpp
First thing’s first, let’s go through ‘settings.hpp’- this file has a ton of cool features that not only make missions better, but also make our lives easier.
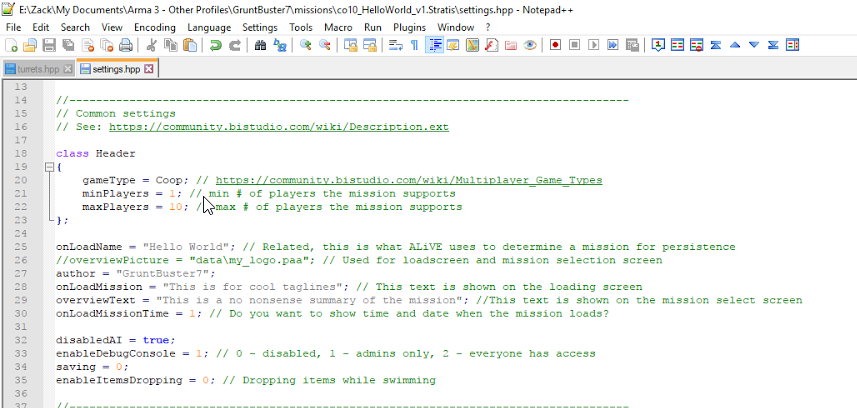 Scroll down until you see these lines- I’ve gone ahead and edited the ones we’ll be looking at: ‘maxPlayers’, ‘onLoadName’, ‘author’, ’onLoadMission’ and ‘overviewText’. All of these are self-explanatory, so feel free to fiddle and experiment with them.
 One of the most important parts of this file is the respawn setting, way down at the bottom. It is currently set to allow unlimited respawns. For the sake of simplicity, we will set the number of lives to ‘1’. This means that if someone dies, they will be put into spectator instead of respawning. There are several mechanisms for allowing respawn, but they will be covered at a different time.
Once you’ve made the changes you want to, save the file and close it. Next, we’ll set up the gear script.
Gear
For our needs, we can use one of the many default gears that are in the framework. To set this up, navigate to:
co10_HelloWorld_v1.Stratis\CBB\gear\CBB_gear_init.sqf
In this file, look for ‘CBB_soldierprep_west’. This line can be edited to change gear script that is run for the ‘West’ faction. Luckily for us, this script is already set to read as:
‘CBB_soldier_west_rhs_usarmy.sqf’
With that set up, we can leave the sqf part of the framework for now (keep the folder handy though). To finish the framework, we still need to add a few compositions in order to make the mission run properly.
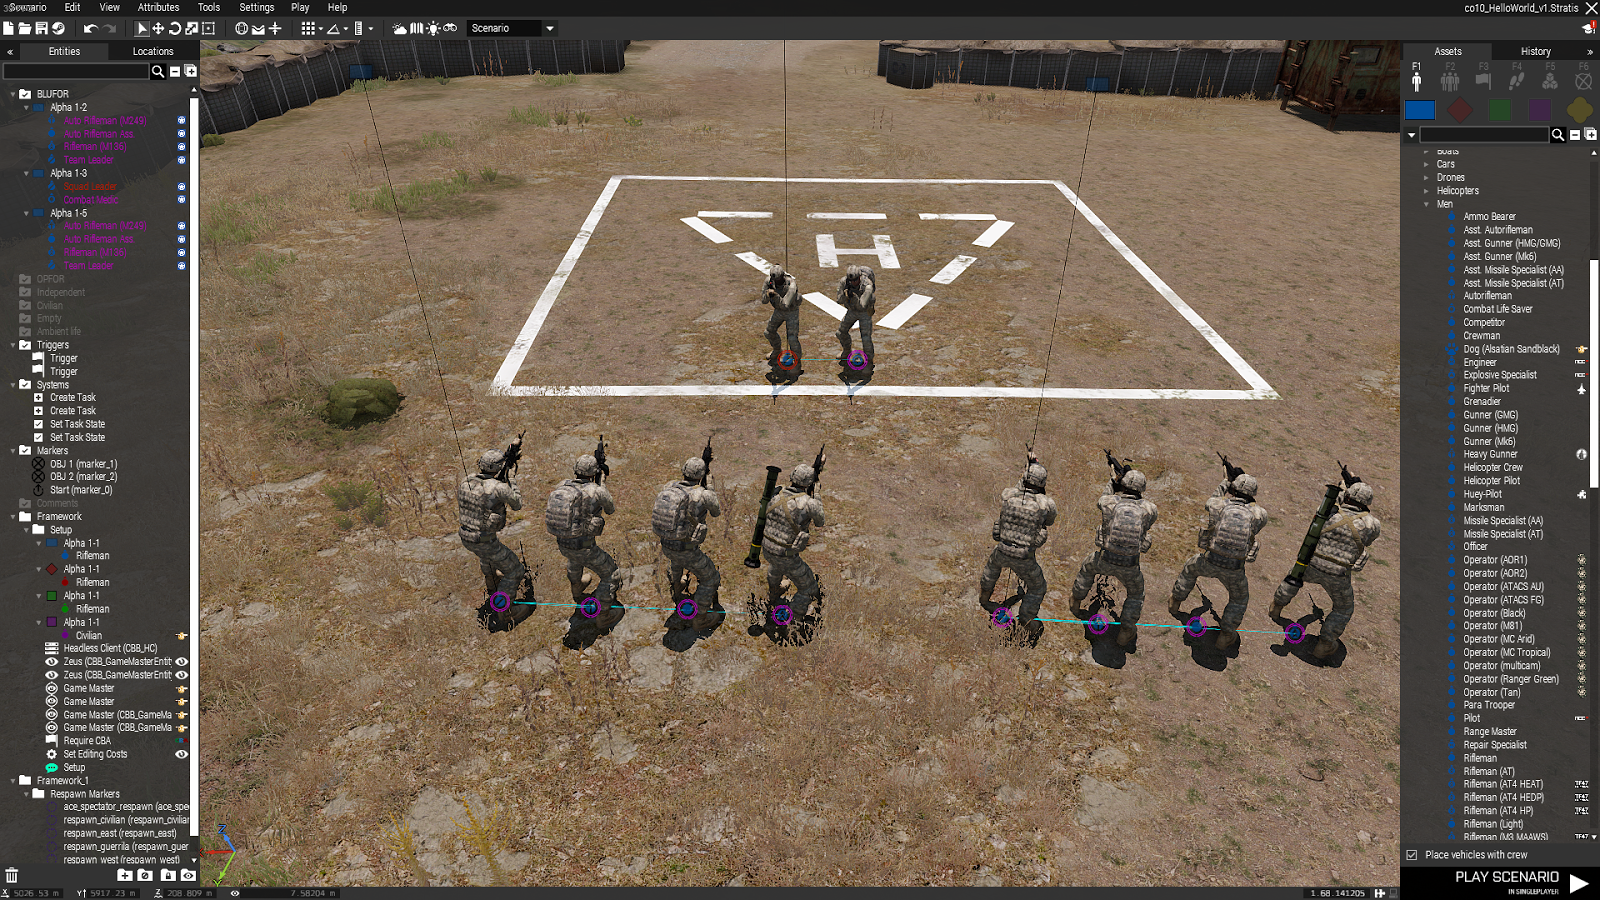
 Provided you have set up the compositions as detailed on the wiki, you should be able to replicate the picture above. The ‘Setup’ composition should be put nice and far away, while the respawn markers should be wherever you would like each group to spawn (even if there is no respawn, this should be done. Trust me).
That’s it. That’s the framework implemented (minus the briefing, which we’ll come onto soon enough). Pat yourself on the back and take a rest. We’re about to do the hard bit.
Provided you have set up the compositions as detailed on the wiki, you should be able to replicate the picture above. The ‘Setup’ composition should be put nice and far away, while the respawn markers should be wherever you would like each group to spawn (even if there is no respawn, this should be done. Trust me).
That’s it. That’s the framework implemented (minus the briefing, which we’ll come onto soon enough). Pat yourself on the back and take a rest. We’re about to do the hard bit.
Step 3- Populating the mission
Populating a mission is sadly not as simple as putting down some goodmans and some badmans, pointing them at each other and leaving it there. Depending on what you’re aiming for, there’s a significant number of things you need to check and sort out.
Weather and Time
It sounds trivial, yes, but these can have a significant impact on your mission. Rain reduces visibility and makes it harder for aerial units to spot things, while sunny missions might blind people on winter maps. Fog can improve performance, but can also make life hell for players. The time of day is equally important. A nighttime mission is atmospheric and good for stealth, but can cause the AI to act erratically. Dawn is often a cool setting, but the low sun can blind pilots if they happen to be flying West. These are all things to be thought about and can be adjusted in the ‘Environment’ section [Ctrl+I].

Objectives
I like to place my objectives and their markers first thing- that way I always have a clear outline available to me in case I get distracted or leave the mission for a while. For this mission, we’ll need 3 markers- a start point and two objective markers. These can be found in the ‘Markers’ tab of the CREATE window [F6].
 The label displayed on each marker (as well as the marker’s variable name) can be found by double-clicking on the marker. I’ve labelled my objective as ‘OBJ 1’ and ‘OBJ 2’ so that I can refer to them in the briefing.
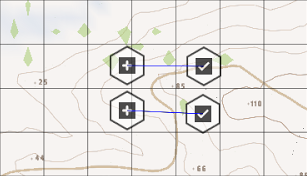
Next, we’ll make the objectives actual events by using the the ‘Intel’ items to create and complete tasks. These are found under the ‘Modules’ tab [F5]. In total, we will be needing 4 of these blocks: 2 ‘Create Task’ modules and 2 ‘Set Task State’ modules. These can be placed anywhere for reasons that will soon be clear. Once placed, link (right-click→connect→Sync To) each ‘Create Task’ module to one of the task state modules as shown below:
The label displayed on each marker (as well as the marker’s variable name) can be found by double-clicking on the marker. I’ve labelled my objective as ‘OBJ 1’ and ‘OBJ 2’ so that I can refer to them in the briefing.
Next, we’ll make the objectives actual events by using the the ‘Intel’ items to create and complete tasks. These are found under the ‘Modules’ tab [F5]. In total, we will be needing 4 of these blocks: 2 ‘Create Task’ modules and 2 ‘Set Task State’ modules. These can be placed anywhere for reasons that will soon be clear. Once placed, link (right-click→connect→Sync To) each ‘Create Task’ module to one of the task state modules as shown below:
 These blocks form the basis of the default A3 task system- I use them out of personal preference, and there are alternatives available; however, I won’t be covering them here.
Opening the ‘Attributes’ dialog window of a ‘Create Task module with right or double-click, you will be presented with this view. There are a number of fields available here, but for now you can just copy what I’ve written here. Feel free to toy around with it.
These blocks form the basis of the default A3 task system- I use them out of personal preference, and there are alternatives available; however, I won’t be covering them here.
Opening the ‘Attributes’ dialog window of a ‘Create Task module with right or double-click, you will be presented with this view. There are a number of fields available here, but for now you can just copy what I’ve written here. Feel free to toy around with it.

 Repeat this for objective 2, with the obvious changes in the relevant fields.
The next thing we’ll need is a condition to set off that task state module. Triggers are essentially just conditions that can be used to ‘trigger’ certain elements in the mission; an objective completion module, for example. Take a trigger that fits roughly around the town from the ‘Triggers’ tab [F3]. If a trigger doesn’t fit exactly, its dimensions can be edited in the attributes window. I’ve chosen a 500m diameter circle for my objective.
 Open the attributes window if you haven’t already and replicate the picture below.
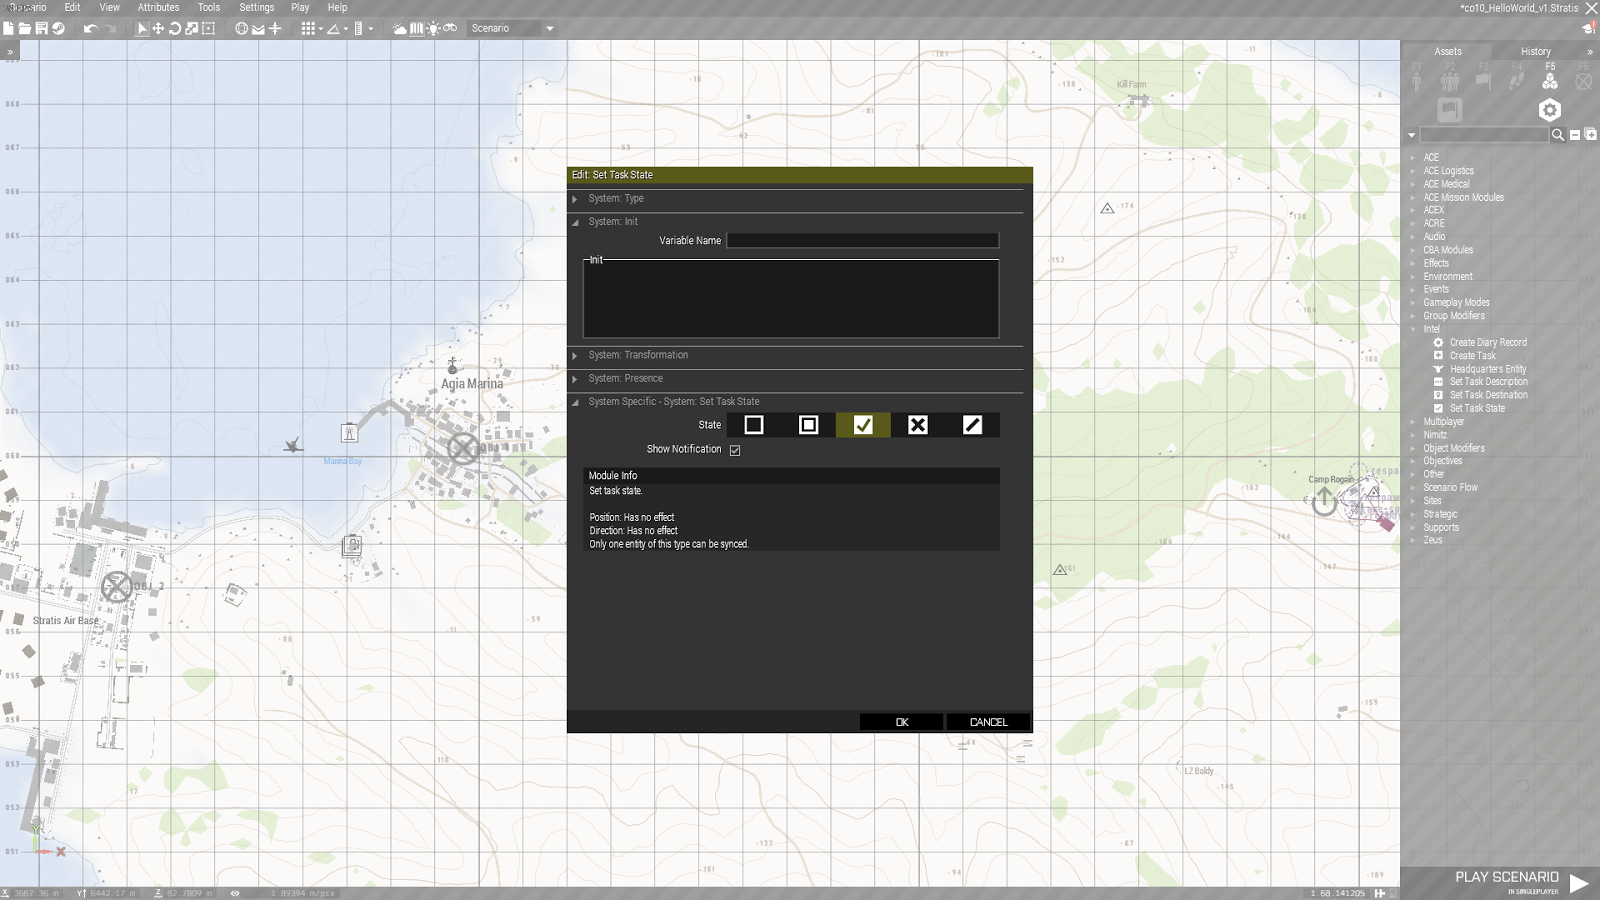
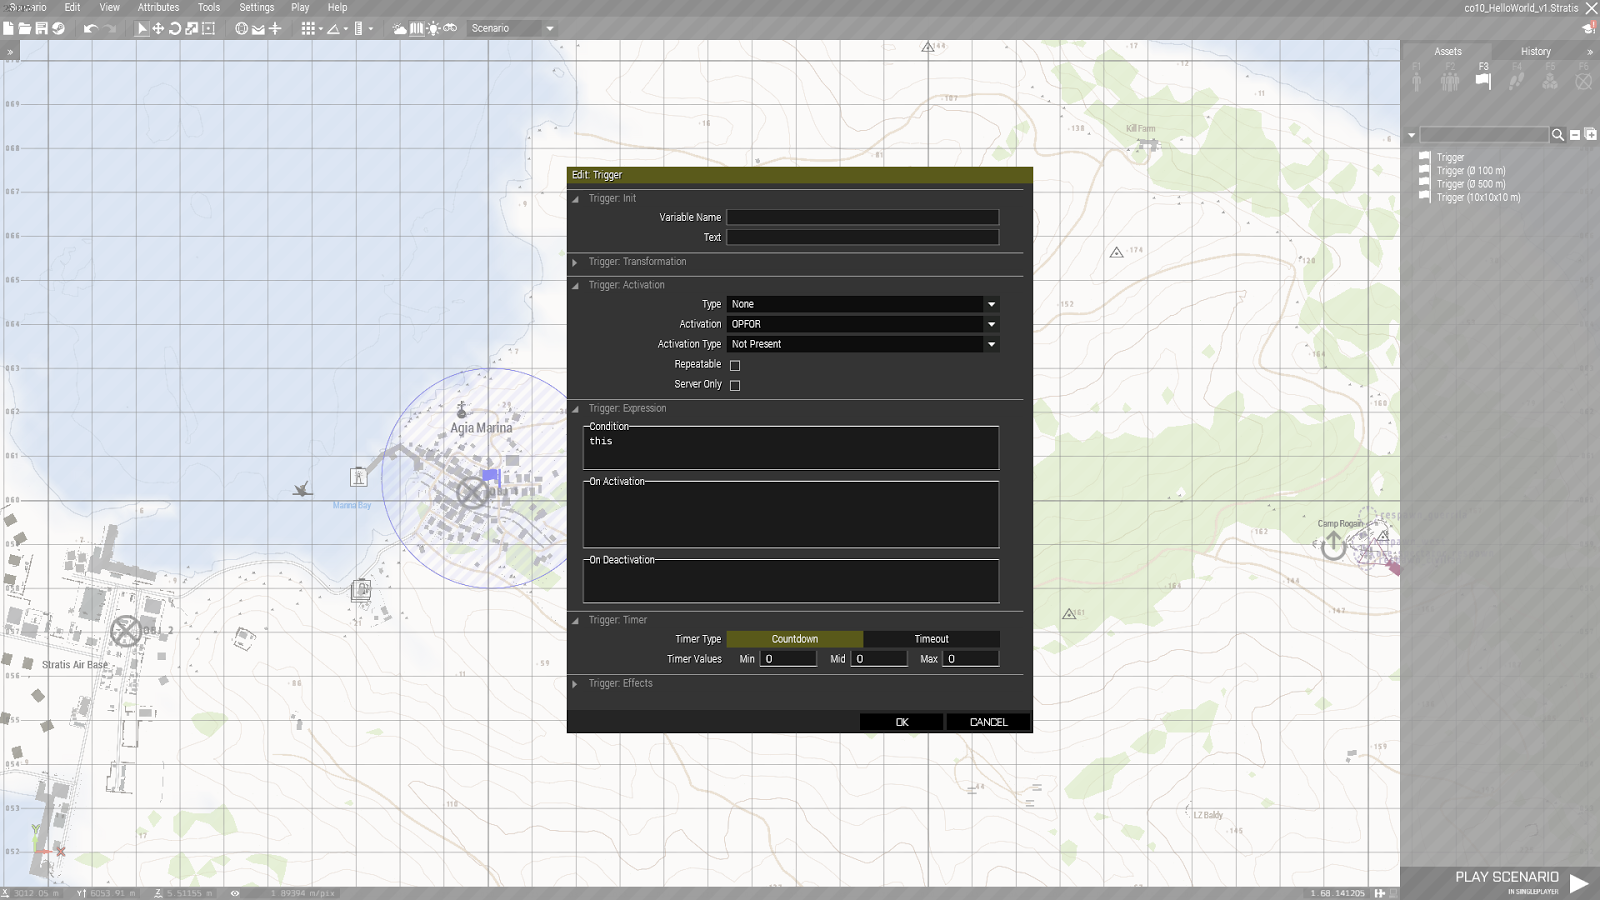 This trigger will activate when there are no more 'OPFOR' units in the circle i.e. all the Russians in the town are dead. Next we have to link this to the ‘Set Task State’ module for Objective 1. Once that is done, repeat it for Objective 2. You should end up with something like the picture below.
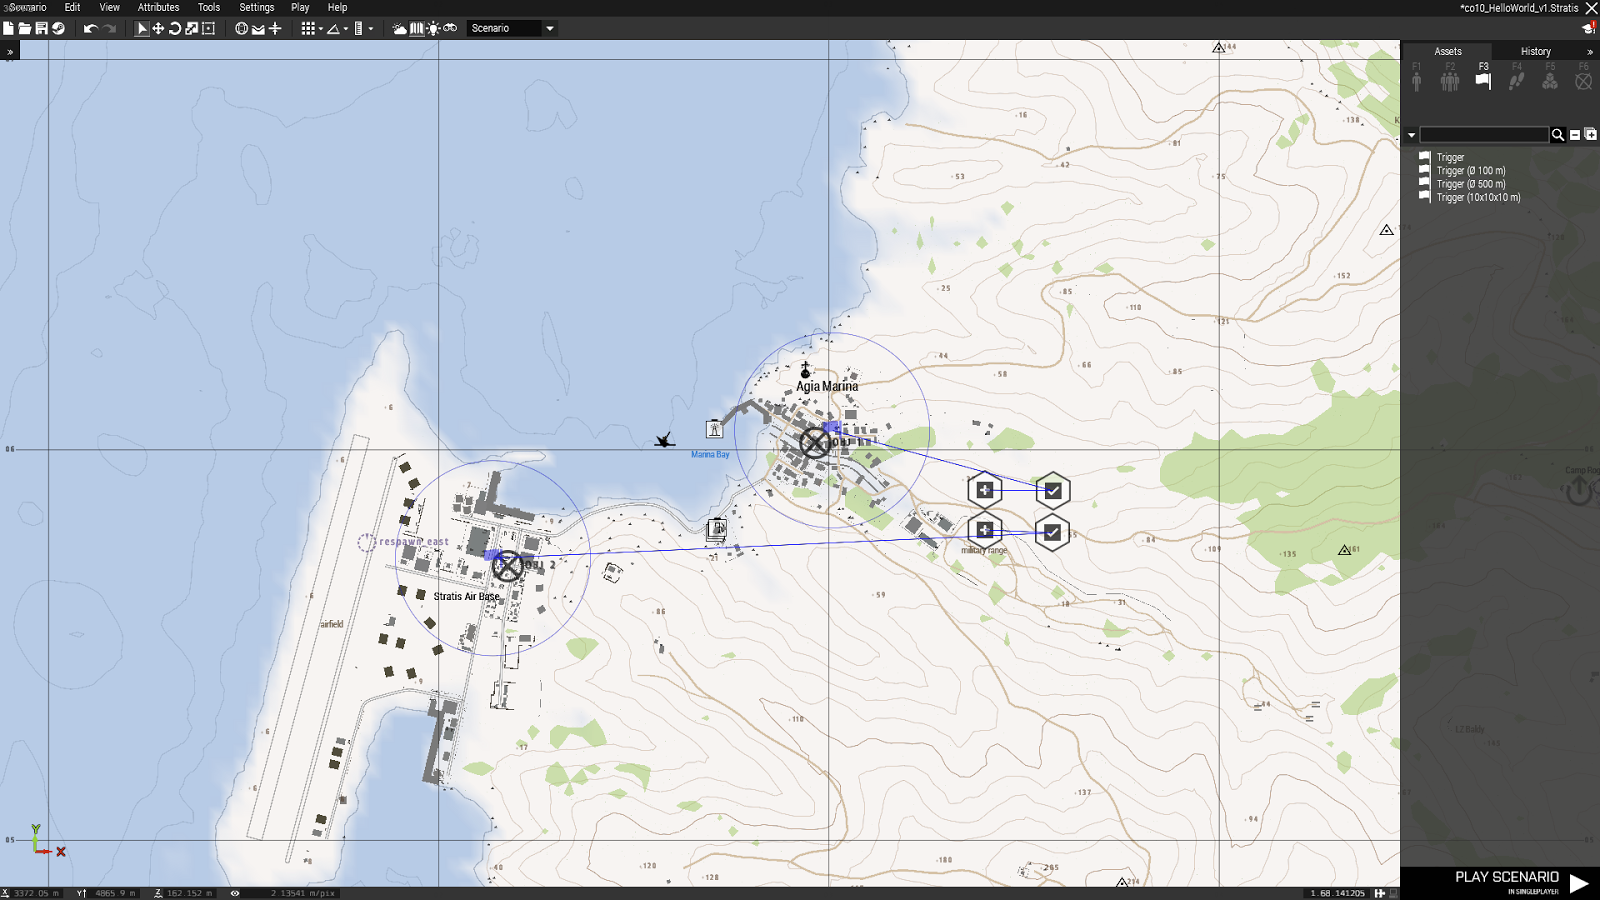 If you have something that resembles this picture, you should have two working objectives. If you were to play this mission now, both objectives would complete themselves straight away- there’s no Russians in the town to begin with. Time to fix this!
Adding Players
First off, let’s put down our own players- this let’s you jump in and play the mission to test it [Enter] if you so wish, although it will probably be super boring right now. We decided that the mission had 10 players and some HumVees right at the beginning, so let’s get those down. Go to the ‘Objects’ tab [F1] and find ‘USA (Army-W)’. This is the woodland variant of the Red Hammer Studios (RHS) modset. We want an Squad Leader, a medic, and two fireteams of 4. Their compositon is up to you, but I will give each team:
- A Team Leader
- An Auto Rifleman
- An Assistant Auto Rifleman
- A Rifleman (AT)
This gives each team a wide spread of capabilities for relatively few men.
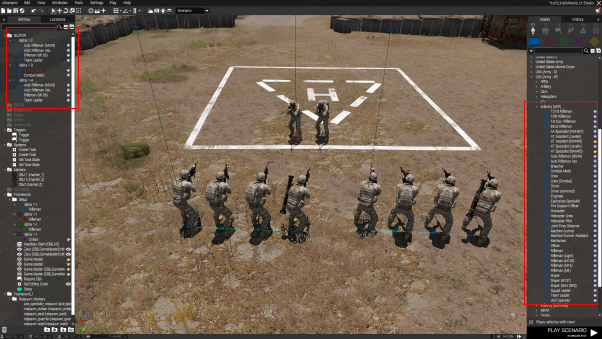 There are a few things to note here. The first unit you place will be marked in red- this is the ‘Player’ slot. If you launch the mission without a unit marked as ‘Player’, very little will happen and it will not be playable. Another thing to note is the squad separation on the left hand side. This is achieved by linking [Ctrl+left click] units together- the TLs are not linked to the SL and as such form their own teams.
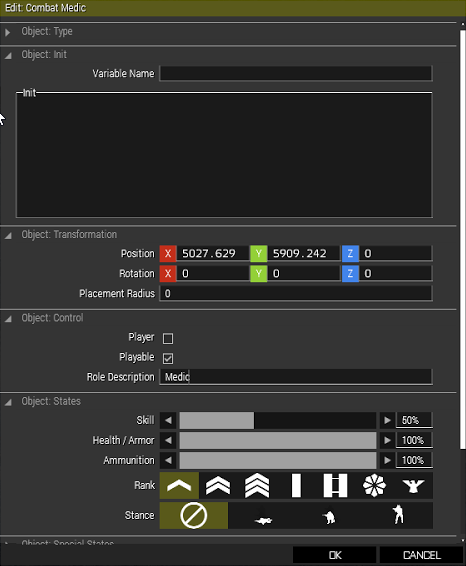
Next, we need to edit a few features of these units to make them playable. Open the ‘Attributes’ box of the Medic. Here, we will tick the ‘Playable’ box and name the unit something easy to identify in the mission slot screen (Medic, for example).
There are a few things to note here. The first unit you place will be marked in red- this is the ‘Player’ slot. If you launch the mission without a unit marked as ‘Player’, very little will happen and it will not be playable. Another thing to note is the squad separation on the left hand side. This is achieved by linking [Ctrl+left click] units together- the TLs are not linked to the SL and as such form their own teams.
Next, we need to edit a few features of these units to make them playable. Open the ‘Attributes’ box of the Medic. Here, we will tick the ‘Playable’ box and name the unit something easy to identify in the mission slot screen (Medic, for example).
 Repeat this for every unit.
Note 1: You can edit the attributes for multiple units at once by box-selecting them and opening a collective attributes window. This will not work for their Role Descriptions, however.
Note 2: Units will appear in the slot screen in the order that they were placed. Pay attention to what you are placing and when.
You should now have something that looks like this:
 We will also be needing those HumVees. They will be under the same faction, in the list marked ‘Cars’. Find a vehicle you like and place it down- make sure to press ‘Alt’ while placing vehicles that you don’t want to come pre-crewed; this is fine for enemy vehicles, but cause obvious problems if players want to use vehicles that are filled with stubborn AI.
As these vehicles will be providing support for your foot soldiers, they need to carry the supplies to support them- luckily, the boffins at CBB Admin HQ have made sure that they are already pre-packed with these supplies. In future though, make sure you check that these vehicles have the right supplies for your guys.
We will also be needing those HumVees. They will be under the same faction, in the list marked ‘Cars’. Find a vehicle you like and place it down- make sure to press ‘Alt’ while placing vehicles that you don’t want to come pre-crewed; this is fine for enemy vehicles, but cause obvious problems if players want to use vehicles that are filled with stubborn AI.
As these vehicles will be providing support for your foot soldiers, they need to carry the supplies to support them- luckily, the boffins at CBB Admin HQ have made sure that they are already pre-packed with these supplies. In future though, make sure you check that these vehicles have the right supplies for your guys.
