Table of Contents
Preset Changes - July 1st, 2018
Due to some changes on our end, the autoconfig URLs have changed. This requires you to edit your Arma3Sync entries for the repo(s).
- You WILL NOT need to redownload the modset.
- You DO NOT need to delete the old entries.
List of new autoconfig URLs
| Clear Backblast | http://cdn.clearbackblast.com/required/.a3s/autoconfig |
| Clear Backblast - Module - ALiVE | http://cdn.clearbackblast.com/mod_alive/.a3s/autoconfig |
| Clear Backblast - Module - ASR AI3 | Deprecated |
| Clear Backblast - Module - Operation Trebuchet | http://cdn.clearbackblast.com/mod_optre/.a3s/autoconfig |
| Clear Backblast - Module - World War 2 | http://cdn.clearbackblast.com/mod_ww2/.a3s/autoconfig |
| Clear Backblast - Optional - DynaSound | http://cdn.clearbackblast.com/opt_dynasound/.a3s/autoconfig |
| Clear Backblast - Optional - Enhanced Soundscape | http://cdn.clearbackblast.com/opt_ess/.a3s/autoconfig |
| Clear Backblast - Optional - Head Range Plus | http://cdn.clearbackblast.com/opt_hrp/.a3s/autoconfig |
| Clear Backblast - Optional - Immersive | http://cdn.clearbackblast.com/opt_immersive/.a3s/autoconfig |
| Clear Backblast - Optional - JSRS4 | http://cdn.clearbackblast.com/opt_dragonfyre/.a3s/autoconfig |
| Clear Backblast - Optional - No Crosshair | http://cdn.clearbackblast.com/opt_nocrosshair/.a3s/autoconfig |
| Clear Backblast - Testing | http://cdn.clearbackblast.com/testing/.a3s/autoconfig |
How to update the repository configuration in A3S
Step 1
Open Arma3Sync and select the Repositories tab. Then proceed to click + (Plus) button on the right side to open the Add New Repository window.
Step 2
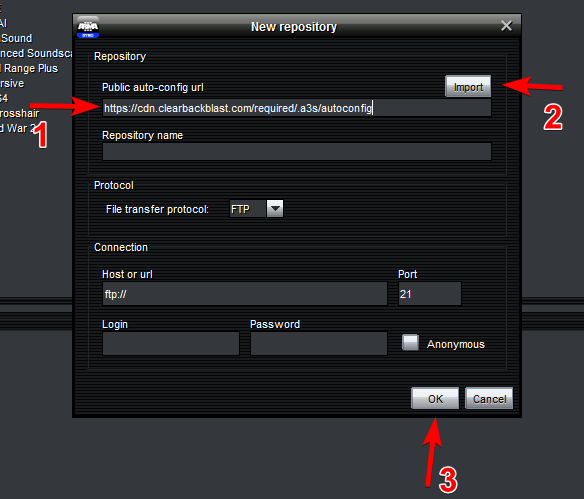
Paste the autoconfig URL into the textbox, press Import, then press OK. The repo for the autoconfig URL is now updated with the new settings, and can be used as normal.
ARES
If you have ARES access, the update process is slightly more involved. Start by clicking the pencil icon next to the ARES repo in the repositories tab. From there change the File Transfer Protocol drop down to HTTP. Next set the Host or url value to http://cdn.clearbackblast.com/opt_ares. Save and you should be good to go.

